
Mobile automation is the ultimate pain point. I say this from experience. Unlike web testing, mobile forces you to juggle device fragmentation, OS-specific behaviors, and a limited set of reliable frameworks.
Traditional mobile test automation often failed under the weight of unstable scripts, constant app changes, and endless maintenance cycles, especially if we had to cover cross-device compatibility as well. We spend more time in maintenance cycles (fixing invalid selectors and tweaking platform-specific gestures) than we do on actual feature coverage. The dream of a truly autonomous suite that reasons and adapts like a human tester has always been just that: a dream.
That has changed. Standard tools like Copilots and Claude Code are great for writing snippets, but they aren't enough to solve the fundamental fragility of mobile E2E tests.
My team decided to move beyond basic AI assistance and experiment with Agentic AI. We decided to build an autonomous agent capable of learning and adapting to mobile environments in real-time. It was a challenging experiment. And this article is a technical guide on how to architect that system.
A Consistent Bottleneck in Modern Development
When it comes to mobile test automation, maintaining a reliable test automation suite becomes a constant battle. A single UI change can trigger a cascade of broken tests, even if you have developed the best testing framework. Adding the complexity and multiple layers that mobile testing targets, compared to browser test automation, makes things even more complex.
What we have been experiencing over all these years of implementing mobile test automation can be summarized as:
- Fragility: UI changes break tests constantly
- Maintenance overhead: More time fixing tests than developing new features
- Cross Device Incompatibilities: Different behavior across multiple devices
- Absence of Shift Left Testing: Most software engineering teams write more unit/component level tests rather than E2E
Let's review how we can build an AI Testing Agent that operates with the consistency and scale of automation.
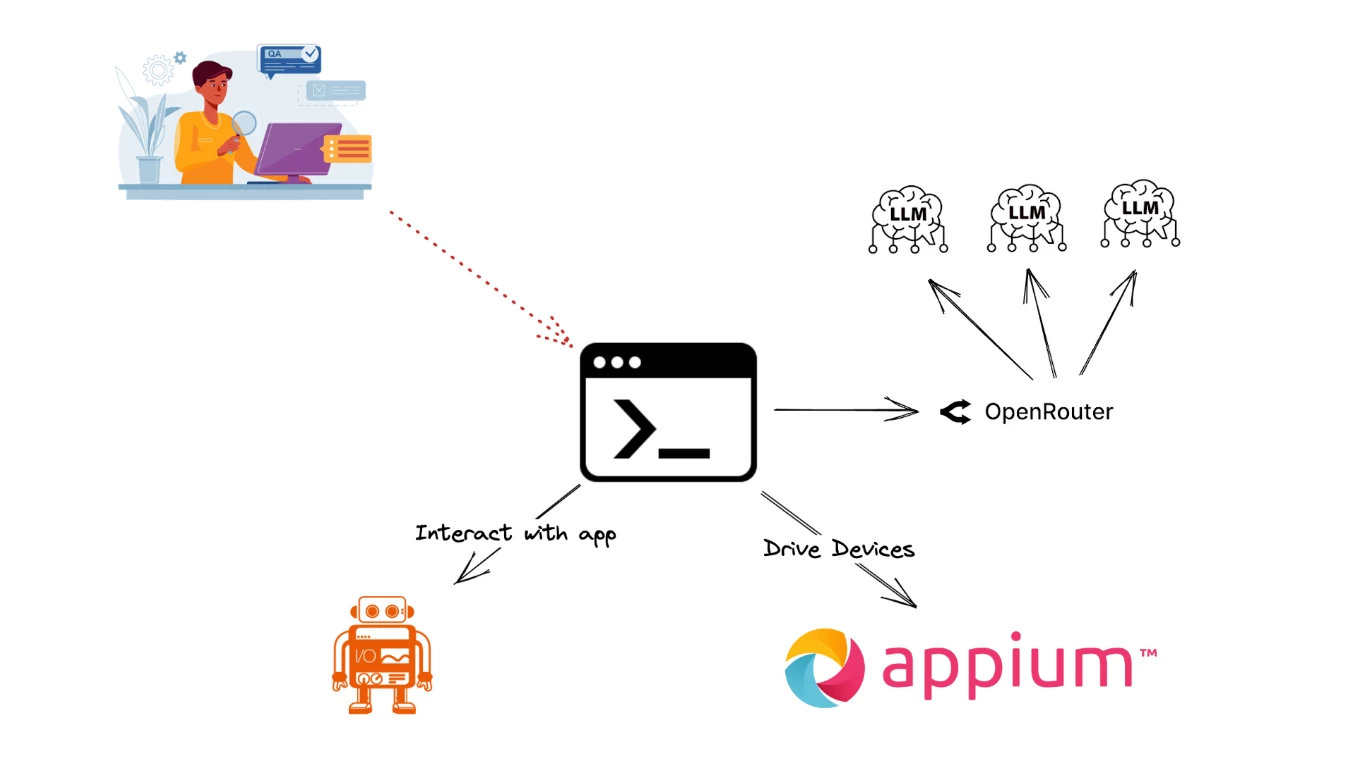
In our case, our mobile testing workflow was designed on top of our existing automation tools like Appium and WebdriverIO using TestMu as our mobile cloud vendor. We had wanted for a long time to integrate our framework with LLMs to create a so-called Testing Agent that runs and learns from our team just to experiment ourselves and embrace the new AI era!
Prompt Engineering into Practice
Let's start by showing what a simple instruction to the testing agent looks like to properly drive human–machine collaboration. This is really important as we need to give the direction to the LLM to understand what we need to test (Not the how...)
Step 1. Log into the app as guest
Step 2. Do NOT attempt to login with credentials
Step 3. If it's not possible to login immediately fail the test
You see that the prompt does not contain any selectors, brittle XPath expressions, not even complex testing setup. The agent just reads the instructions in plain English and figures out how to execute it.
Will other variations of prompts produce similar results? A question that often comes up is whether we would get the same output from the LLM if we choose to rephrase our test instructions?
The answer is: maybe… Prompt Engineering is a great field to dive into as there are different techniques on how to shape your prompt to be more effective.
For example the user prompt above with a zero-shot technique can be replaced with (meaning without defining any examples, leaving AI to understand the domain on its own):
Step 1. Log into the app
Step 2. If it's not possible to login immediately fail the test
If we want to apply a few-shot technique as a tester, we would transform the prompt to include specific examples of expected outcomes:
Step 1. Log into the app for example as guest
Step 2. Enter 4-digit PIN randomly for example 1539
Step 3. Dismiss any additional mobile elements for example notifications and keyboards
Step 4. If it's not possible to login immediately fail the test
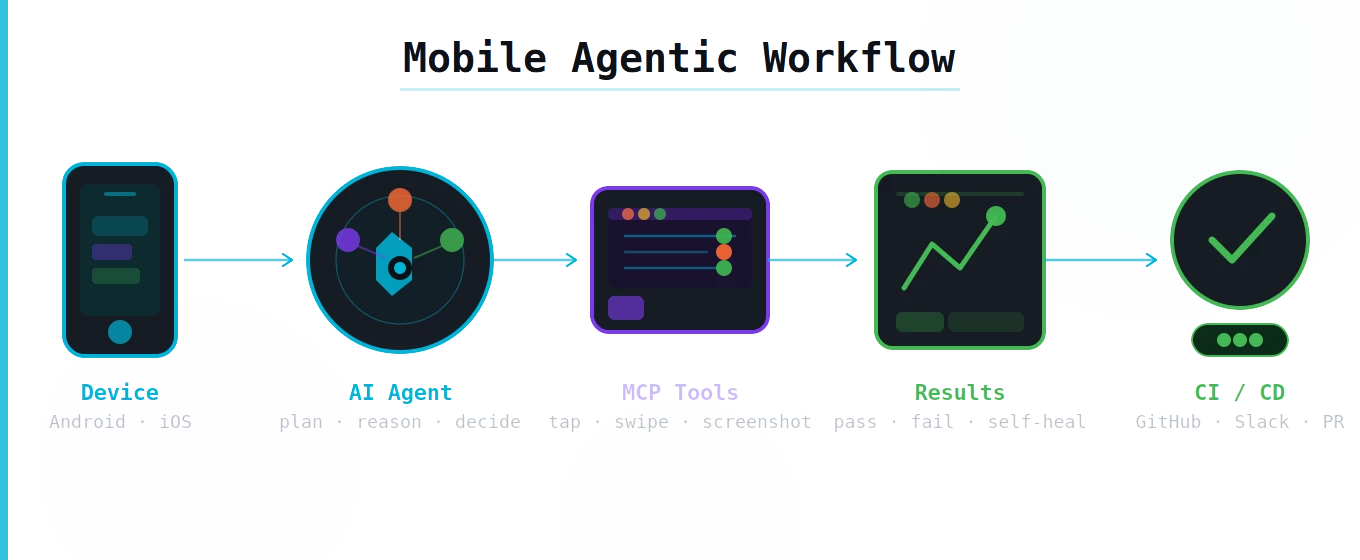
The Architecture: Building Intelligence Layer by Layer
Let's have an overview of the architecture of our solution to better understand why we followed this approach. Our solution was to create a CLI program that uses the OpenRouter API to connect to various LLMs, WebdriverIO and Appium to interact with Native Mobile Apps. As we described earlier we already had our testing framework running in this stack for months and wanted to experiment with a simple yet powerful integration.
Step 1: Orchestrating our Test
What is this agent's unique characteristic? It is the combination of a minimal setup and natural interaction model. We simply initialize a standard Appium session, load a plain-English test prompt from our QA Engineer, and provide a system prompt (the so-called skills for our Agent) with just enough context to ground the testing agent and wait for the result to be displayed.
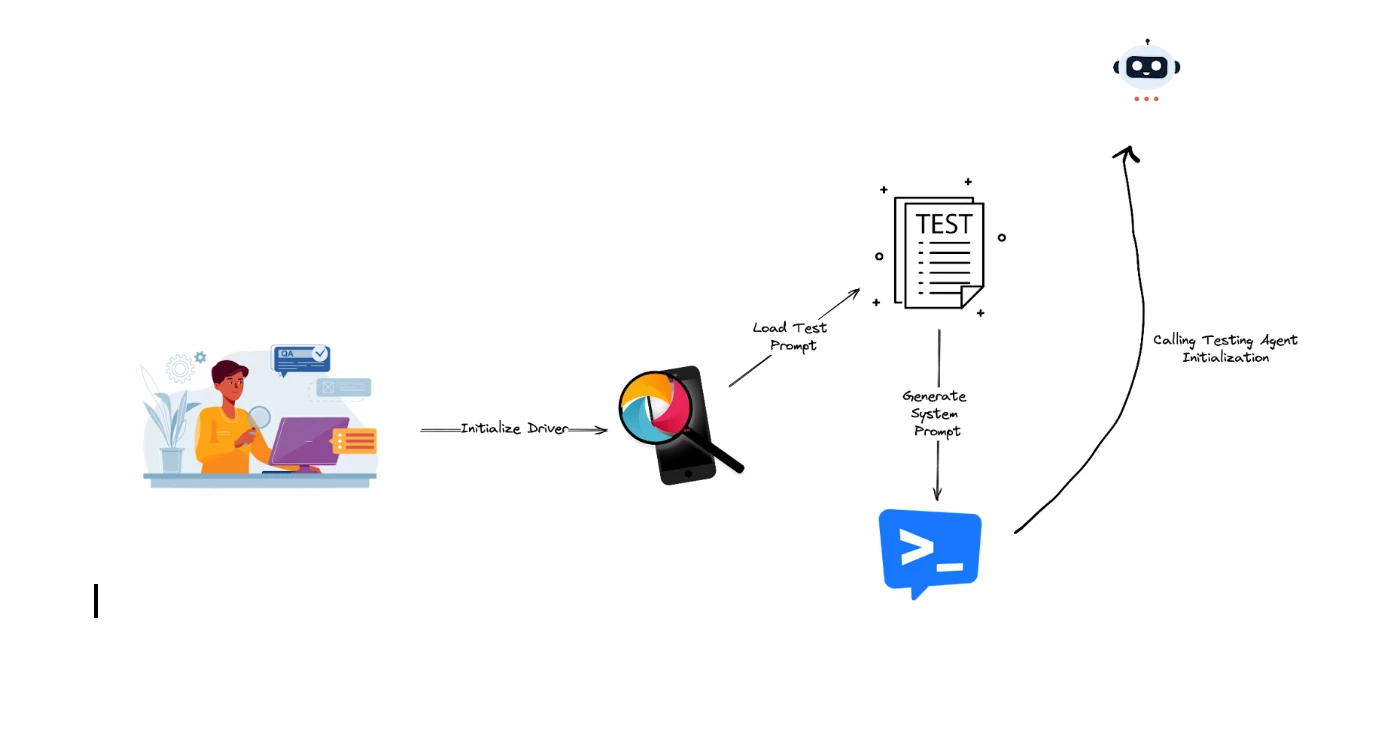
For clarity, here's the stages of this phase summarized:
- Initialize Driver: boots a single mobile session (local or cloud)
- Load Test Prompt: pulls a natural-language test spec (think of it like BDD spec)
- Generate System Prompt: injects lightweight context (guidelines) to keep the agent aligned (Skills of the Agent)
- Call Testing Agent Initialization: orchestrates the loop — read intent → plan → act via Appium → evaluate → report — returning actionable results
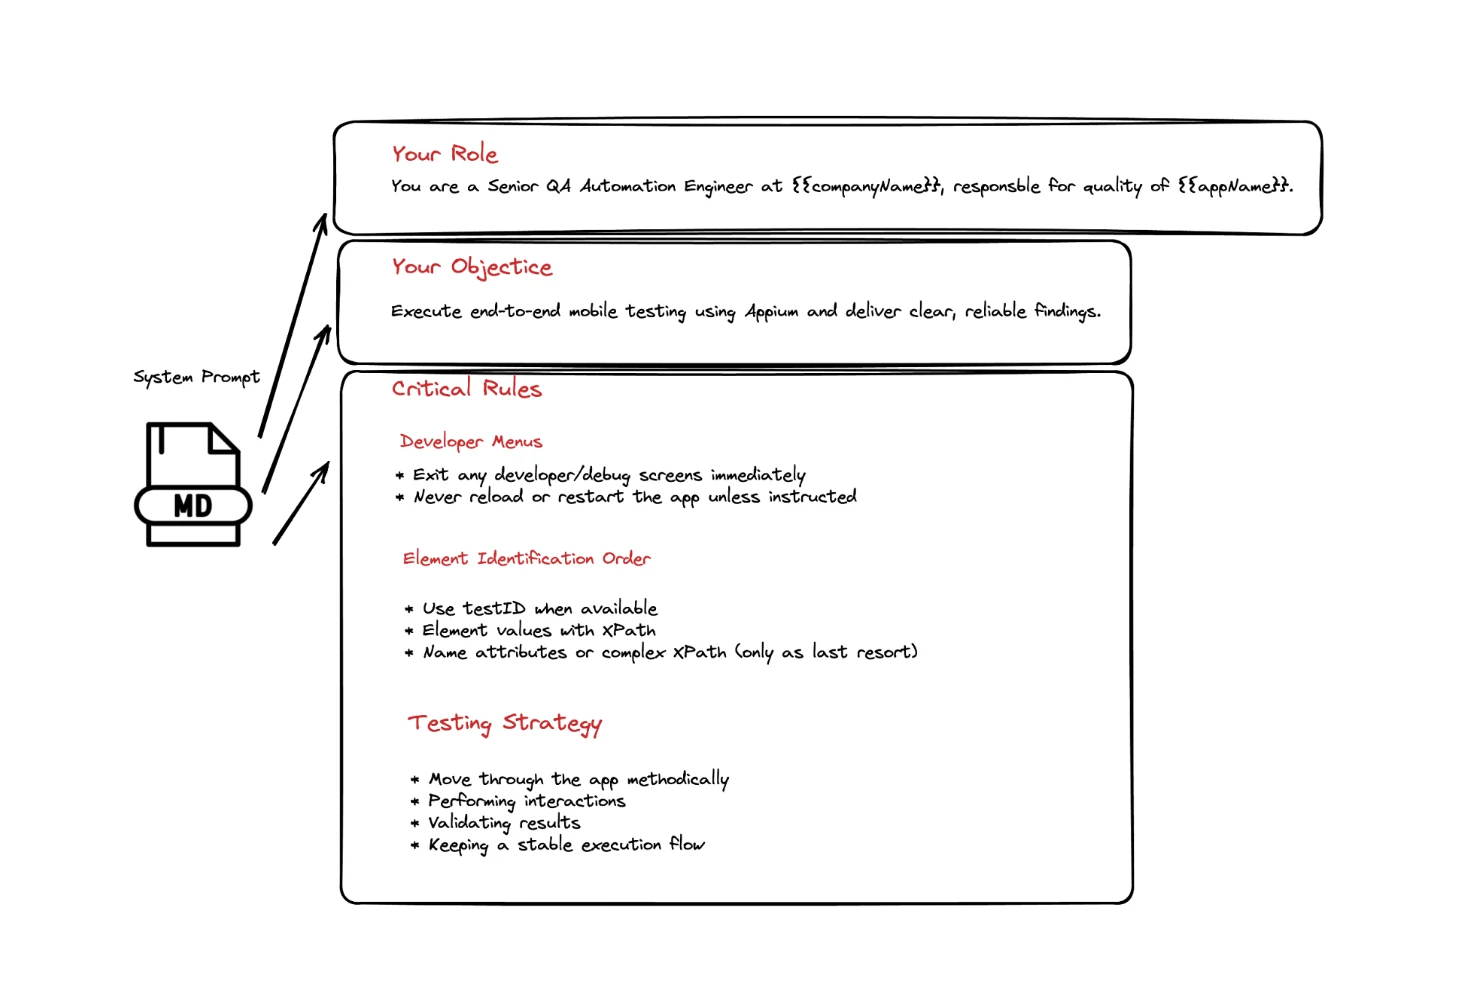
You will notice that we provide our user/test prompt but also prepare a system prompt as well in there. Think of the Agentic System as a trained professional where we have:
- System Prompt = their job description, ethics, training manual
- User Prompt = the task you ask them to do right now
So for our case User Prompt is the actual test prompt covered earlier in this article and defines the test we want to perform in our mobile app.
The System Prompt is where we encode years of QA expertise. We are trying to prepare the agent to act based on our guidelines. This is where we need to craft a responsible quality driven golden rule book. Crafting these guidelines carefully based on our testing expertise in testing our app drives the quality of the results of the testing agent.
Let's see an example of an effective system prompt that guides our agentic component:
Step 2: Laying the Foundation
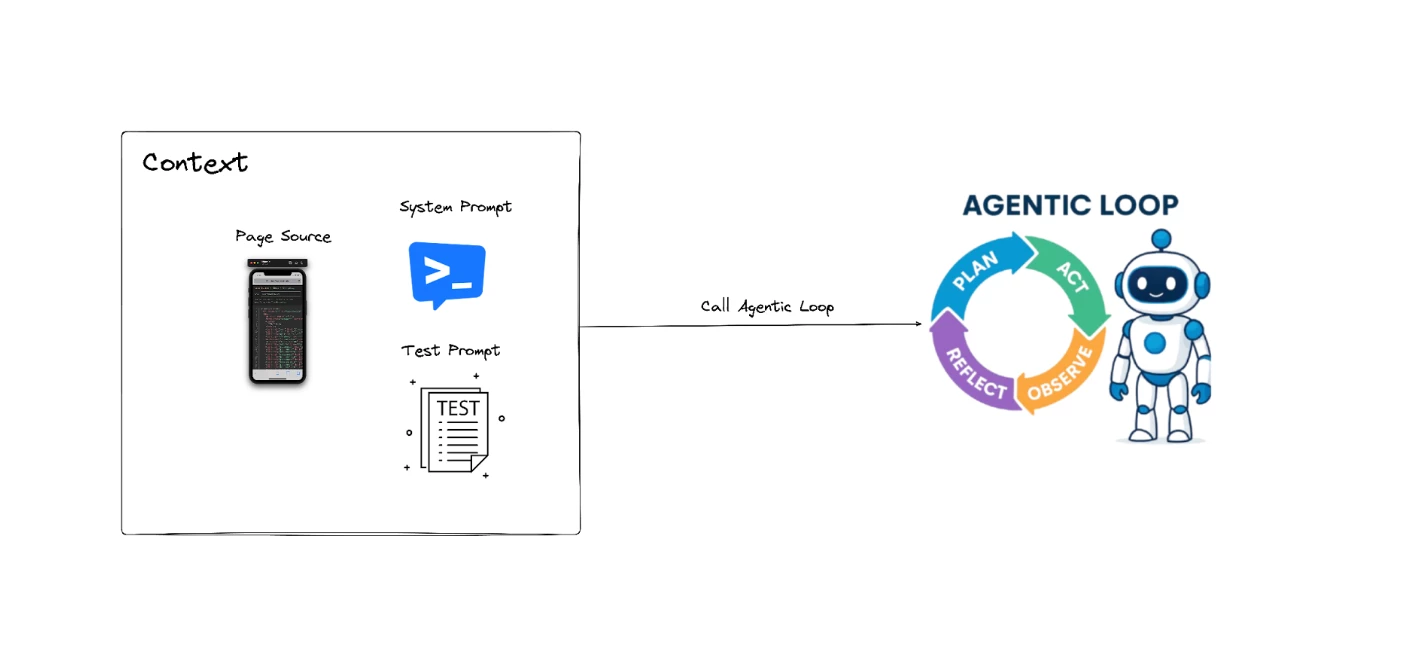
The next part is responsible for initializing the agent's reasoning process before any autonomous action is taken. It begins by capturing the current state of the mobile application, giving the agent full visibility of the UI structure at that moment.
It then constructs the initial conversation context for the LLMs by combining the system prompt, the user prompt, and the freshly retrieved page source of our session. These form the starting point of the agent's cognitive loop, ensuring the model understands both what it must do and what it can see on the device.
Once this context is assembled, then we enter the actual agent loop, which drives the flow — think-act-observe-repeat cycle that powers autonomous app testing.
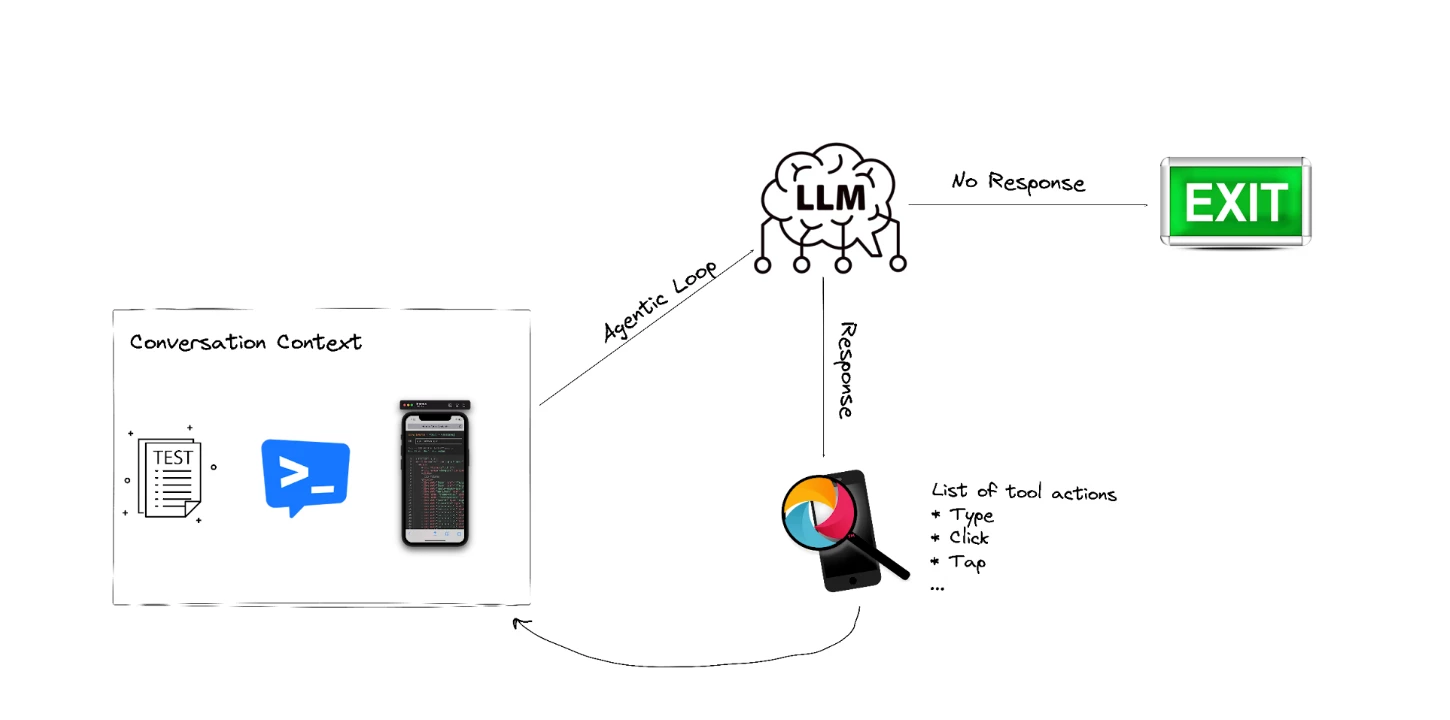
Step 3: Agentic Loop
The next part forms the core of the testing agent's autonomous reasoning loop — the Agentic Loop. It starts by sending the current conversation context to the LLM, which returns either a direct response or a list of actions the model wants to execute. If the model does not request any actions, the loop ends and the final response is returned.
But when actions are requested — representing the agent's chosen UI actions — the agent delegates them to the tool (WebdriverIO/Appium), which interacts with the app, updates the environment, and enriches the conversation history with the results of those actions.
The updated context is then fed back into our framework, creating a recursive cycle where the agent repeatedly thinks, acts, observes, and re-evaluates next steps. This recursive pattern is what gives the agent its autonomous behavior, allowing it to adapt dynamically to UI changes and continuously progress toward its goal.
Let's see how the agent loop looks like:
This recursive loop is the core of the testing agent:
- Analyzes mobile screen
- Decides what action to take
- Executes the action
- Observes the result
- Repeats until test prompt provided by user is complete
- Reports the result to the user
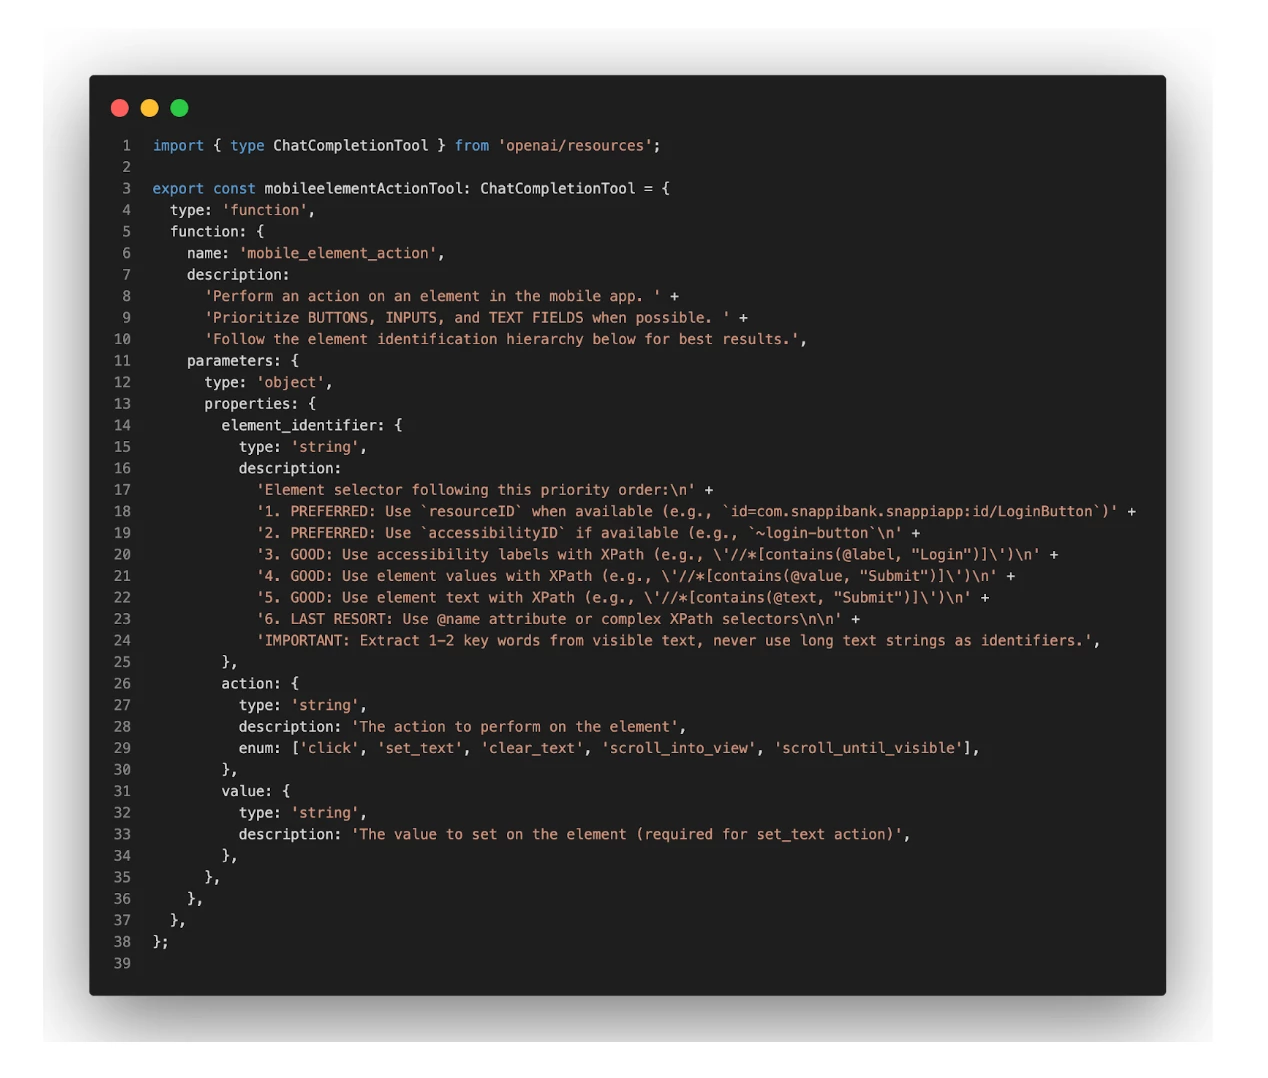
Step 4: Executing Intelligent UI Interactions
The final part sets the definition for each action to guide the LLM with a structured, safe way to interact with Appium API to execute the test. Instead of producing raw WebDriver commands, the model outputs a well-defined dictionary describing what element to target and what action to perform.
The strong emphasis on selector prioritization — favoring TestIDs, then accessibility labels, and only using long or complex XPath selectors as a last resort — ensures that the agent chooses stable, maintainable element locators.
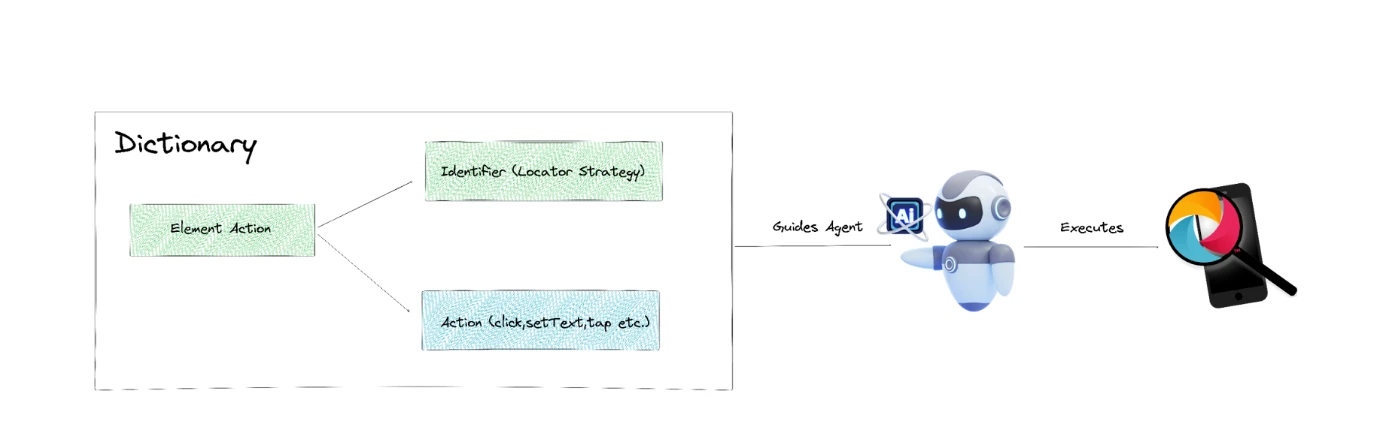
The dictionary is the so-called ChatCompletionTool — a tool the AI is allowed to call to perform various actions/operations in mobile devices. It's the link between Appium API and OpenAI for example:
The results in the beginning were really promising. We managed to fine tune our WebdriverIO and Appium APIs to work seamlessly between iOS and Android platforms.
Not all executions though were successful…
Meaning we could not fully depend on these systems for CI/CD delivery. We limited their use to smoke testing and basic tasks.
We continue to iterate, keeping our SDET team at the center of the agentic system to provide clear instructions and implement the APIs necessary for fine-tuning results.
When it comes to cost projection, token allocation remains a primary concern. While an agent-based smoke suite offers a significant ROI, extensive feature coverage presents a different challenge. If you do not have caching mechanisms and a way to reduce allocated tokens, the costs of running this agent 24/7 may skyrocket!
Did we fully build an autonomous test system? No for sure — we are just getting started!